

The design, installation and maintenance of timber decks is vital to ensure that this part of the home will look fantastic for many years after construction.
Hardwood or softwood timber decking board installation is one area where small mistakes can lead to expensive rectification works.
Here's a list of do's and dont's that we've put together for you...
A Protective Finish
As a minimum, a protective finish should be applied to all surfaces (including any freshly cut ends) of each decking board, preferably before fixing to the joists. A protective finish includes products that penetrate the surface of the timber and products that provide a film or coating to the surface of the timber.
Some common protective coating products are generally water based or oil based, with a colour (stain) option available.There are two choices when protecting the timber decking; on site application and pre-oiled to save you or your client time on the job!
Remember to educate your clients on the maintenance of their deck
Homeowners should be advised of the best steps to maintain their deck, relevant to the conditions.
They should be aware that they will need to maintain their timber deck with regular cleaning such as sweeping and removal of garden debris and recoating as required. The use of a high-pressure hose or a pressure cleaner should be discouraged, as too powerful a spray may do damage, and it is recommended to use decking cleaning products that brighten and clean the timber after sweeping down. A few of these simple actions will extend their deck for years to come.
We recommend providing education on the reapplication of coatings to decking boards to prevent their premature deterioration. The regularity of recoating must be judged according to individual siting conditions where differences in the amount of exposure to the weather will determine the regularity of maintenance required. As always, please refer to the protective finish manufacturer’s recommendations.
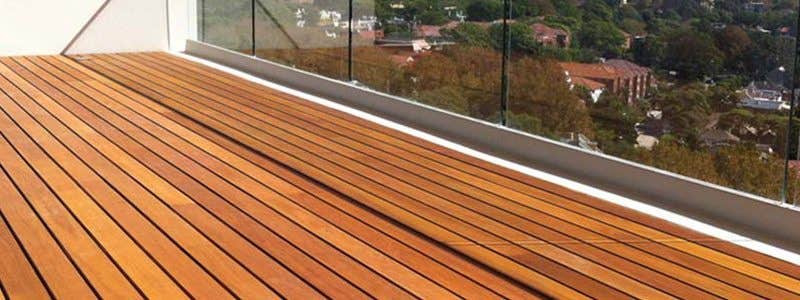
Deck spacing
Decking board spacing is an important consideration, however, there is no regulatory standard stipulating a definite figure.
As timber is an organic product and is influenced by the environment, it is important you plan the gap you intend to leave between the boards, knowing the boards will expand and contract.
Timber industry groups, such as Wood Solutions, will generally suggest a gap of 3mm for 90mm boards and up to 6mm for wider boards. Once again, this is a suggested and nominal dimension. Please refer to the supplier specifications and take into consideration the proximity to the ground clearance, as this may alter the suggested board gapping.
Got good sub-floor ventilation?
If you don’t have good sub-floor ventilation you may encounter ongoing problems with mould, cupping and distortion in the decking boards. The basic principle behind sub floor ventilation is to expel the moisture laden air found in your sub floor area and replace it with fresh air.
Ensure there is good sub floor ventilation and pay attention to the installation guides if within the flagged clearance height zones. Closer to the ground may require the gap between boards to be wider to compensate.
Where the timber is less than 400mm from or on the ground, to minimise ongoing issues please consider ventilation and things like surface drainage, access for future maintenance, humidity conditions, timber treatment hazard level and durability class.
| Here are more tips for building close to the gound |
As always, follow good building practice
Good building practice indicates that boards wider than 90mm should be thicker than 19mm. e.g. 140mm board should be a minimum of 22mm. This is especially relevant to assist with decks that are built close to the ground, or where cross air ventilation is limited. A considerable moisture uptake can occur with timber decking which can result in cupping when close to the ground and in exposed applications.
Holding power
Always use specially designed decking nails and screws. They should be hot dipped galvanised, or if you are close to saltwater use stainless steel.
If using nails, they should be finished flush with the decking board surface. Punching nails into the board can lead to premature deterioration of the decking boards. Installers should be particularly wary of this point when fixing decking boards with a nail gun.
Fastening timber decking to steel joists can be a challenge. Timber shrinks and swells as it loses and gains moisture. The moisture content of a timber deck can depend on the season of the year, and other local environmental factors.
| Read our article on choosing the correct decking screw! |
Make sure when fixing to steel joists that the screw manufacturer has a warranty for that fixing method and will warrant the fixing timber decking to steel joist.
Does the deck have a roof?
If you’re building a deck, it may be obvious, but building a roof over the deck will allow for less maintenance of the deck as it is protected from the full exposure of the weather. The decking boards will not have to be re-oiled as often, saving the client time and money in the long term.
When a deck is covered, as the boards aren’t exposed to the full weather, they won’t expand or contract as much, thereby reducing the likelihood of timber splitting, warping, cupping etc. Of course, a covered timber deck can be used all year round which adds to the liveability of the home and more flexibility for your client.
Can’t cover the deck with a roof?
If the decking area cannot be covered, it is worth considering using narrower decking boards as they shed water more readily and will, therefore, be less prone to warping.
Protect your joists
Joist protection consists of PVC or other material placed on top of the joist but under the decking board. This will help protect the joist from water ponding in the decking board gaps which can lead to joists deteriorating prematurely. Whilst this is not a mandatory requirement, it is a good building practice.
| Want to find out more about protecting joists? Read our full article here |
Clean your deck after installation to reduce black spot
Cleaning your deck after installation is critical to reducing the likelihood of black spot. Check out our #nhstradetiptuesday on Black Spot.
The black stains can occur when welding or grinding occurs next to, or on the timber deck, and from timber and metal shavings. These shavings or bits of iron filings land on the timber where they react with the timber’s tannins, causing the area to go black.
Clean thoroughly to prevent black spot, or if black spot has occurred use a cleaner containing oxalic acid and follow the directions to dilute with water. Apply the mixture to the deck with a hard bristle brush or broom, leaving it for around 15 minutes before washing it off with a hose.
Original article published in 2019